Showing posts with label sewing area. Show all posts

Friday, November 19, 2010

crankypants

Anyone who has made their own clothing before knows that most of the patterns you can purchase require some, if not a lot, of altering to fit your own body shape.

The same goes for the dress dummies/dressforms you can buy.

I have this one:


And of course the measurements for when you buy one of these do not always line up with your actual measurements. Just like patterns. Hooray! /sarcasm

So I went to re-adjust mine today after re-measuring my plumpish body.

And I broke mine.

Apparently when you have the hips on one of the smaller sizes, you cannot put the waist on one of the larger sizes. So apple-shaped sewers - stay away from this dressform.

Thursday, September 9, 2010

done!

black dress

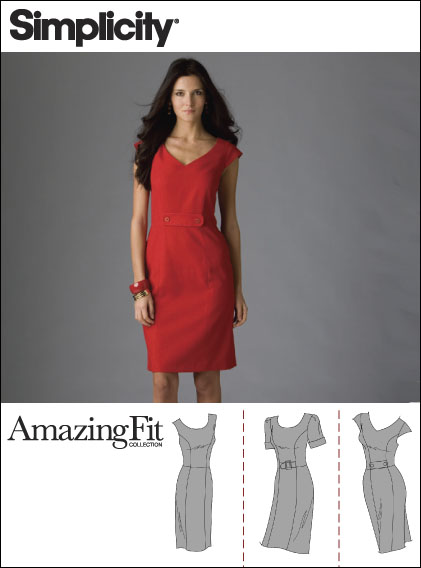
Simplicity 2648

Pattern Description:
Misses dress with individual pattern pieces for slim, average and curvy fit and for A, B, C, or D cup sizes. This pattern has either a round or v-neck, short sleeves, cap sleeves, or no sleeves and princess seams.

Pattern Sizing:
I bought the 16-24 envelope. I cut View C, size 16, but I think a 14 would have been better. I cut the C-cup for the top and definitely used the "curvy" pieces for my curvy bottom.

Did it look like the photo/drawing on the pattern envelope once you were done sewing with it?
Yes. In the picture I show of my finished garment I don't have the little tab at the waist but after wearing it today, I decided it definitely needs an embellishment at the waist.

Were the instructions easy to follow?
I'm a stubborn engineer... I don't follow directions. ;D

What did you particularly like or dislike about the pattern?
I definitely liked the different sizing options (cup size and hip/butt adjustments). Even though I usually just throw the directions back in the envelope, I kept these out to check every once in a while to make sure I was on track... it's been a while since I've made a dress for myself! I noticed that they wanted you to sew the side seams wrong sides together to help fit the dress better (before sewing the final side seams). This seemed a little weird to me and of course I didn't do that because it wasn't one of the steps in my made-up directions.

Fabric Used:
I used stuff I had in my stash. I honestly don't know what it is... some sort of cotton blend. The lining was cheap stuff from Jo-Anns that I also already had in my stash.

Pattern alterations or any design changes you made:
I did the petite alterations (the ones already in the pattern).

Would you sew it again? Would you recommend it to others?
I think I will sew it again if it's not going to be too obvious that it's the same dress - perhaps next time I'll do the other sleeve option. And I think I would bring the front up a bit - it didn't seem to sit as flat against me as I'd like and if I bring the front up into the shoulder seam a little more it would sit better.

Conclusion:
I like it - and it's a great pattern to have for wardrobe building!

More pictures on my Flickr account: http://www.flickr.com/photos/kcroteau/sets/72157624843610186

Oh! And I almost forgot! I was in the Etsy Finds email on Tuesday - it was one of my mason jar pincushions. I've sold a few of those since the email, so that was a nice surprise. :)

Monday, August 30, 2010

woo hoo! sewing room has been relocated! :)

Previous sewing room location: basement.

room

New location: what used to be the office (on the first floor!).

relocated sewing room

I love the new location. A few more pictures can be found here.

One of the cutting tables had to stay downstairs and as a result, I had to downsize on the size cutting mat I can use (unless I put the ginormous one on the dining room table). But everything else fit rather well into the room. I would have made it work no matter what - I wanted a first floor room!

After the new pictures were taken, we took a trip to Ikea to find some suitable chairs/stools. My desk is bar-height and I wanted something ~18" tall for the sewing table.

Desk chair:

desk chair

... and stool for the sewing table (before & after):

stool beforestool after

Ikea really wanted me to buy one of their covers since the stool already came with the foam & interfacing-type covering stapled to it. It also already had the scratchy side of velcro on the undersides... I knew I could pull something out of my stash to make a cover so that's what I did.

The current work-in-progress:

dress pieces

Which will be Simplicity 2648 when it's done.


I have high hopes for this pattern since its got different fits - different bust sizes and different hip shapes (slim, average, curvy). Mine will be black - I had the cloth in my stash for a looong time so I have no idea what it really is or where it came from. It's kind of like a heavyweight linen, if that makes sense.

And one more work-in-progress:

bench

We also picked up one of these benches at Ikea to go at the end of our bed. We know we (and by we, I really mean me) want to cover the top. The Mr. didn't think two layers of quilt batting was enough of a cushion for his cute little bottom, so at some point I have to go to Jo-Anns and get some foam. And figure out what I'm going to cover it with...

Wednesday, March 11, 2009

more lights!

Every time I turn on the lights for my sewing area, I still think this looks a little weird - having recessed lighting plus pendant lamps. Especially where the pendants over my cutting table are kinda close to the recessed lights.

Oh well. It works.

room

Friday, January 16, 2009

What I'd Rather Be Doing

What I'd rather be doing than sitting at my desk:
  • setting up my new tables in my sewing room
  • reading my book
  • sewing
  • buried under the blankets in bed watching a movie
  • scanning old pictures


We went to Ikea last night. The intention was to get tables/desks. For the basement. Ryan wanted a table/desk primarily for soldering stuff. He's been playing around with electronics lately... for the grill. The desk in the office is too small and gets too cluttered if he tries to work up there. We still have an unused corner of the basement, so he wanted a table/desk to put down there so he wouldn't have to play mad scientist in the office.

Okay, so that's table/desk #1.

I kind of had an idea that I should get another table for my sewing area to use under my cutting mat. The problem is that my cutting mat is huge. I love it, but it doesn't fit on the table that I had which is now home to my sewing machine and eventually my serger once I move it over there. I was eyeing the Ikea dining room table that is the same style as the sewing machine table and my (custom!) ironing board. But then as we went through the desk/office area, I found a table that was on sale... if I bought 2 of those tables it would a) be cheaper than the dining room table I looked at and b) be larger than the dining room table I looked at. I'm hoping the cutting mat will fit on it. If not, then I'll use one of these tables for the sewing machines, and use the older table for the cutting mat again. Why is it so difficult to find appropriately-sized sewing room furniture? :P

So there's table/desk #2 and #3.

THEN as we went through the bedroom section, we start looking at bed frames. We totally did not go in there to look at bedroom stuff, but you know how Ikea is. You have to look at everything. Right now, with the frame we're currently using, the bed shakes if someone rolls over or gets out of bed. It shakes a lot. It bothers me more than it bothers Ryan, but I think he was getting tired of hearing me complain about it, so we ended up getting a new bed frame. This new one should be a lot sturdier than the one we're using, plus it'll allow the mattress to be lower (we won't have to use the box springs anymore). Aaaand it'll fit under the window. Right now the top of the frame is above the window sill, so the sill is getting a little beat up.

Everything is still in the boxes, sitting on our dining room floor.... which eventually I'd like to get a new dining room table too, but that'll have to wait. :)


My stupid foot is doing well. 3 1/2 weeks after surgery, I went for an xray. I expected to have another cast put on after the xrays were taken, but my doctor walked into the exam room and said, "Well, it's been less than 4 weeks... but you're completely healed already. I don't know how but I'm not going to torture you by putting another cast on." Yay! So she kept the back half of the cast on, wrapped it in an ace bandage, and then sent me on my way (back) home to get my clonky velcro boot. I can already walk around the house fairly well without the boot, but to make sure my doctor will still be happy, I'm wearing it whenever I leave the house.

Monday, December 29, 2008

A real post.

I suppose instead of just posting a link so you can use me as an Artfire referral... I could post a real update. Sort of.

I've been sitting on my ass for the past two weeks. I had surgery. Again. The last surgery was successful, but another problem came up as a result of that first surgery. Soooo I had another plate and a screw added. I think my left foot/ankle is around 75% bionic now. :D I'll try to see if I can get a copy of the xray I'm having next week or a print-out of it to post on my Flickr. The last one was pretty neat. :)

Christmas was nice, but too short. We went to Mary Jane's on Christmas Eve to visit with her, Claire, and Paul.

Christmas Day we drove to my parents' house and spent the night. My dad was actually home on Christmas - my mom wasn't sure if he would be since he was still working crazy amounts of hours to restore power to people who were still out from either the ice storm or the snow storm that came a week after the ice.

Ryan was too nice to me for Christmas and gave me a serger. :) This one, specifically:


Other than having surgery, nothing much has been happening with me. Guess there wasn't too much to update after all.

Sunday, September 7, 2008

new ironing board!

Almost anyone who sews wishes at some point in time that he or she had a bigger ironing board. Or one that isn't tapered.

I wished for a bigger ironing board too. Except I went the next step and made my own. :D

Step 1: find a suitable table. I got this one at Ikea. I got this one because it was counter height (which is the height I normally set my ironing board to), it was 72 inches long - good for ironing pretty much any width of cloth, and it included some storage space (drawer, shelving).
table


 Step 2: Gather your supplies for the top. I bought 2 boxes of this kind of velcro (and it isn't cheap!) - it has adhesive on the back of one side and on the back of the soft side there's nothing so you can sew it to something. 
velcro

batting

The batting is the kind used to make oven mitts. I doubled up on this for the table just to be on the safe side.

The cloth I used was some stuff off the clearance rack at Jo-Anns - some calico they were trying to get rid of so it was only $1/yard. :)

Step 3: Sew velcro to the cloth. Sew the layers of batting next to the velcro you just sewed on. Sew the other strip of velcro on, but remember that the fabric will stretch so don't just measure the width of your table and go from there. My cloth stretched a 1/2 inch.

Step 4: Attach sticky velcro to the table and put pad on!

table

Monday, June 16, 2008

Stimulating the Economy

That's what we're supposed to be doing, right?

New couches for the living room:


Spooooon bracelet from a favorite Etsian (FireChickTick):


A dressform (finally!):


And soon - a serger. :) (I still have to shop around before I settle on one.)

Friday, May 2, 2008

new artwork for my sewing area!

One of jellybeans' prints was on the front page of Etsy this morning when I logged in. I clicked on it, and ended up buying 3 prints from her shop!


AND since I gave her her 700th sale, she let me pick either 1 free print or 3 free cards so I chose this one:


I can't wait until I get them, frame them, and hang them up! :)